Saturday, April 30, 2011

Zundapp Factory Photos - mechanical

An early Zundapp Advertisement for the "Autobahn" capable KS500


Engine "ghost" photo. The Cam Gear & Oil Pump Gear are a fiber type material. A well known Zundapp guru tells me these gears last quite a long time. He has seen ones from the 30's still in good usable order.

The "Bing" carbs. Similar to those used on BMW's and other motorcycles.


Rear "ghost" view of KS601 Engine


The chain assembly in the transmission. These are very robust and long lasting.


Front fork assembly


Plunger rear suspension. Some upgrades were available for these back in the day.


Zundapp Final Drive Assembly


Another front end photo.


Zundapp Coversion?

I got this photo of a Corvair Converted Zundapp KS601 from the ADV site. I think it still utilized the original Zundapp transmission so that somewhat attests to the strength of the transmissions.

The frame was stretched out quite a bit to stuff the 6 cylinder boxer motor in.


The Zundapp Transmission chain configuration. I have a friend who had ridden one years ago and he said it felt like a rubber band. The manual shifter engages a system which automatically shifts the gears, The lever does not directly link to the gear set.


If for some chance my Zundapp engine was completely shot I might entertain the thought of a BMW engine coversion. I have the 1982 R65 which could be a potential donor but.......I'd hate to destroy one of the few remaining KS601's. If I did do a conversion it would have to be reversable to the original drive train.


Monday, April 25, 2011

Let the "bleed" begin.....Zundapp Style

The ultimate Zundapp...in my opinion. The Zundapp KS800. Four cylinder flathead engine. Manual hand shift. An Art Deco work of art.


The KS600 Hand shift. This bike has the same foot lever / linkage as the KS601 but also utilized a hand shifter along the tank.


While the engine cylinders soak I've been scrounging up a few misc. parts via the Internet.


Found this 50's NOS 6 Volt horn over in Greece for cheap. Not a KS601 original but the price sure was right. It is around 3.5" diameter so should fit where the original lived. I'll need to bury it in the backyard for a few months so it matches the rest of the bike.


My gas cap is dented up pretty good....this original KS cap has a few less dents. It was a $5.00 purchase.


My KS has one "ball tip" lever and one short spear type lever. I bought the shorter of the two here so I have a matching duo.


Someone in the past has hacked up my linkage. It still functions but the proper pins were missing and the linkage pieces had been split. This replacement linkage is the most expensive item on the page.....but this will get things back in order. The KS600 had both a foot shift and a hand shift lever. They ran a rod from the right side linkage up to a tank side hand lever. Maybe I'll copy that design and rig up a hand lever. I think that would be cool.


One proper Bing carb screw to replace a BMW idle screw which was improperly fitted.


These are the proper pins needed to affix the new shifter linkages.


I'm missing the front upper fender brace. This brace comes with a nasty old "bobbed" fender. I'll remove the brace and refit it to my fender. I do have some old school aluminum fender struts but preferred the original ones.


This is a clutch linkage tensioning spring. My clutch / brake cables are shot. I found an outfit that supplies cable kits which allow the builder to manufacturer their own cables...I'll give it a shot.


Sunday, April 17, 2011

Zundapp Engine top end inspection

My curiosity got the best of me so I started taking things apart today. Pulled all the rocker covers and everything looks good. A little grimy but that is to be expected. The dip stick was stuck so I had sprayed it with WD-40 a couple of weeks ago. A little effort and it finally broke loose. The oil looks pretty clean but smells bad. The solids have had 30 years to settle into the bottom of the oil pan.

I decided to remove the cylinder heads to get a look at the cylinder bores. Very easy process and only needed the tools below to remove the carbs, exhaust system, rocker covers and cylinder heads. Old School Simplicity.
The right side cylinder head....pretty cruddy looking as I had it full of Marvel Mystery Oil to loosen things up. Valves don't have any visible deformities anyway.
The right cylinder bore had a bunch of crud in it. The Marvel Oil had loosened up a lot of carbon which was in the bottom. Some surface rust was present but it cleaned out easily. No surface pitting that I could see. That's great news.

The left side cylinder head was a little cleaner. Typical carbon build up. The Left cylinder bore was in great shape with no rust at all.
So far the engine looks pretty good....the push rod ends show no wear, the cylinders have no ring ridges from wear, and the cylinder surfaces look to be easily salvageable.

Good news all around.

I reassembled the engine, carbs, exhaust then filled the cylinders with Marvel Oil. I'll let her soak for a couple of months while we're out of state.... She should be ready to free up when we get back.

I'll then remove the pistons, cylinders and heads for closer attention as needed.

I now think that there is definitely hope for this project!

Regardless how far I take this project I am going to hear this engine run!

Complete restoration will be overly costly but an original runner would be fine with me.

Saturday, April 16, 2011

Zundapp Bath Day

I finally had a little time and a sunny day to perform a little clean up on the old girl. Sprayed things down with a large can of Gunk de greasing foam and let her soak a while, then to the nearest car wash. Removed about 20 years worth of grease and grime, only about 12 more years left to remove. The alloy heads and rocker covers have a few scars but nothing too bad.

I nearly wrecked my right shoulder trying to get the thing on the center stand. I rigged a sidecar stand I had to hold the bike up.


Found out tonight that the center stand does not have to be fully deployed as there is a ratchet device which locks the center stand at a stable, lower level. I saw another piece hanging next to the center stand but did not know what it was....I'll have to take a look at it and see what's going on there.

The seat is very crispy and obviously has no hope.

I bolted on the reproduction Hella tail light I found for $40.00. Same tail light my sidecar uses.


http://jupiterhack.blogspot.com/2009/03/arizona-sidecar-tour-day-1.html


Nice to see the bike with her proper fenders and attire in place.

8k miles?....I wish.....I think this may be an older KS600 speedometer. The KS601 may have ran up to 120mph.(?)

The fuel tank interior appears to be nice and clean. To my surprise the original Zundapp Wire screen fuel strainer is still in place. The strainer removes easily and simply lifts out.

The fuel taps look to be in very good condition and turn as they should.

The bike has very thick alloy headlight ears which are raw alloy. Most all photos I've seen of Zundapps show the ears painted. The center mounted front shock absorber is seen here too. It mounts to the upper triple tree and to the top of the front fender.

Also has a big alloy friction damper knob. The hole seen to the right is the location for the fork lock. Unfortunately it is missing.


The little Bing carbs have remote fuel bowls. The rubber top covers are still in place but about rotten.

The engine cleaned up fairly well. I'll have to translate the little red tag....not sure what it says....

Air filter is located in the rear top of engine. The tool box sits directly above it. The drive line enclosures are all in place but the rubber looks pretty poor.

The front hub is in real nice condition. The large lower nuts can be turned and lowered which releases the axle for tire / wheel removal. The front and rear wheels are interchangeable.

Monday, April 11, 2011

Zundapp Original Parts

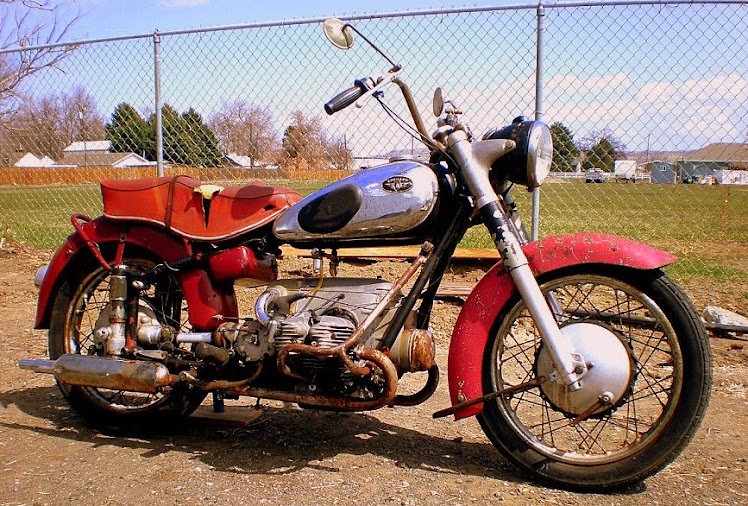
Spent a few minutes tonight and removed the old Aluminum Wassel fenders which were on the Zundapp. Fitted the original fenders and temporarily mounted them. The rear was a tough fit. Two bolts don't quite line up so will need to address that later. The larger fenders really bring the bike back to its' original look.
Had a reproduction Hella tail light so bolted it into place. The rear section of the back fenders is removable to help for rear tire removal.
The front lower fender brace, also referred to as the fender stand, is too short and does not fit properly. I contacted the supplier who I purchased it from to see if a longer one is available.
I hope to roll the bike out this weekend and give it a serious de-greasing at a car wash if the weather permits.

I also installed the front center shock absorber. It is internally shot so will need replacement if I decide to continue with a restoration. A new one is $300.00.


I have a contact with a fellow in San Diego who restores Zundapps. I'll send him a lot of photos and see what kind of a quote he may come up with. I'm relatively sure it will be a very high dollar quote.